


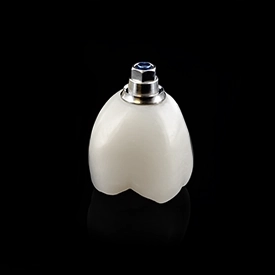
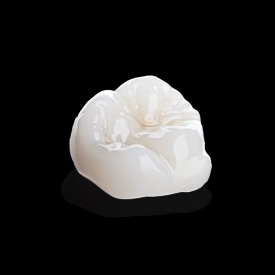
Optimized for permanent single-unit restorations, Sculpture 2.0 delivers the strength, esthetics, and reliability clinicians expect in a permanent restorative material. Recognized with the 2024 Cellerant Best of Class Technology Award, it sets a new quality benchmark for 3D-printed crowns and bridges, combining long-term durability with the efficiency of digital workflows.
This performance is driven by an industry-first 60% Zirconia-infused ceramic filler, providing unmatched biaxial flexural strength exceeding 200 MPa. These properties translate into superior wear resistance, exceptional fracture toughness, and a level of clinical reliability that rivals traditional ceramics while maintaining the precision and speed of additive manufacturing.
1.2 kg Bottle
$ 1,285.71
600 g Bottle
$ 642.21
300 g Bottle
$ 513.51
Shades
1.2 kg
600g
300g

Single Crowns

Bridges

Implants

Inlays and Onlays

Begin by prepping teeth and follow recommended occlusal clearance guidelines. Once completed, use a dental scanner to capture a digital scan of the patient’s preparation. For crown preparation cases, ensure you scan the crown prep, the targeted arch, the opposing arch, and the bite.

Using the design software of your choice, input recommended design considerations to generate the ideal crown design.
Make necessary adjustments to tooth anatomy, contacts, and occlusion for optimal marginal fit and function.
.jpg)
Once you have completed the crown design, nest the restoration using the associated printer software, following recommended guidelines for optimal orientation and support structures for printing accuracy and efficiency. Once complete, export the print job file to the 3D printer. Next, fill the resin vat with Sculpture 2.0 and initiate the print job.
.jpg)
After the print is complete, remove restoration from build plate. Remove supports from the restoration and follow manufacturer instructions for use for wash and post-processing procedures.
.jpg)
Prior to final curing, make adjustments to contacts, contours, and occlusion as needed. For best chemical bonding, apply Rodin Palette and N2-Free Glaze in uncured state and post cure according to manufacturer's recommendations.

Seat crown and check for correct fit. Begin by removing the crown, then apply Rodin EtchPro to the prepared surface. Rinse thoroughly and follow with a dentin primer like Rodin Sensiguard. Next, apply Rodin Bond universal adhesive, paired with Rodin Luting Cement for optimal bonding results.

Printed Material
Zirconia
PMMA
Hybrid Ceramics
Best-in Class Strength and Wear ResRecommended for Permanent Crowns
Offers Best-in Class Strength and Wear Resistance
Designed for Long-Term Temporary and permanent fixed restorations
Over 60% ceramic filler: Zirconia-Infused
Available in 1.2 kg, 600 g and 300 g Bottle
18 Shades (Full Vita Classic Shade Range)

Recommended for Full Arch Restorations
Provides high impact resistance for demanding full-arch cases
Designed for All-on-X, full arch prosthetics, and denture tooth setups
Over 51% ceramic filler for enhanced strength and rigidity
Available in 1.2 kg, 600 g & 300 g bottle sizes
7 Shades (A1, A2, A3, C2, OM1, OM3)

Recommended for Printed Veneers
Enables ultra-thin printing with reliable 0.2 mm minimum thickness
Designed for no-prep and minimal-prep veneer workflows
Over 51% ceramic filler for esthetic translucency and durability
Available in 600 g bottle
4 Shades (OM1, OM3, A, B1)

Recommended for Same-Day Restorations
Prints up to 2× faster than traditional ceramic-filled resins
Designed for same-day crowns, denture tooth arches, and bridges
Over 51% ceramic filler for strength and esthetic performance
Available in 600 g & 300 g bottle
4 Shades (A1, A2, B1, OM3)


Single Anterior Crown
Single Posterior Crown
1.07 per gram
1.07 per gram
$ 5.36
$ 7.50
5 gram
7 gram
1.2 kg
1.2 kg
240
171